
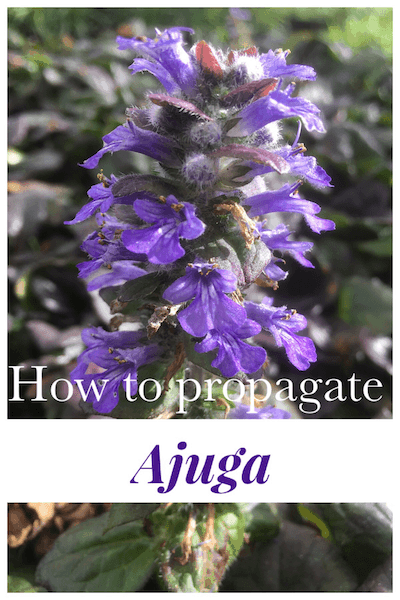
How to propagate Ajuga reptans
This is a quick article detailing 3 different methods we can use to propagate ajuga reptans. These 3 methods can be used on any ajuga reptans variety.
The 3 methods we use are division, cuttings and root cuttings. All of these methods effectively clone the plant. It’s just a personal choice on what method you decide to use.
All are highly effective and we have used each of them personally. Division is the quickest method to new viable plants but also the messiest. Cuttings is very clean and still quite quick. Root cuttings takes the longest time to produce viable plants but is a really cool fun way to do it.
Division
When it comes to producing multiple plants in a short period of time division of ajuga reptans is the fastest method. For this reason it’s our preferred method in our nursery.
We just need to ensure we keep enough stock so that we can divide enough plants to produce a viable number for sale. If we sell too many we need to use one or both of the other propagation methods.
Dividing ajuga’s is very simple
- Firstly dig up an existing clump or remove from a pot.
- Shake as much soil off the roots as possible
- Seperate individual plants (Most will come apart with some gentle manipulation, others might need to be cut apart)
- These individual plants can be potted directly into the garden or into pots.
- Water newly planted ajugas thoroughly
- Keep the soil around the plants moist for the first month
After that month has past the Ajugas will be over the initial shock of being ripped apart and should be able to take care of themselves.
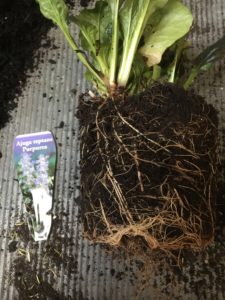
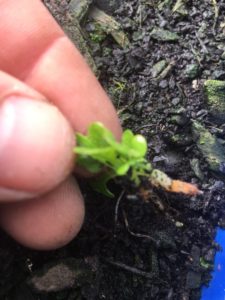
Below are some photos showing Ajuga reptans ‘purpurea’ that we divided. As long as there is some root on the plant and the soil is kept moist for the first month you can almost be guaranteed success.
You’ll even see in the pictures below that even the smallest air root is sufficient.
If like us your going to plant your Ajugas into pots remember to use a high quality potting mix. Also providing some slow release fertiliser is good idea to add extra minerals for faster healthy growth.
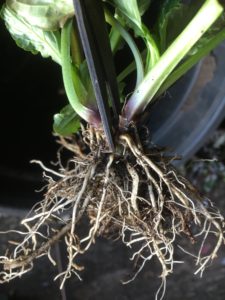
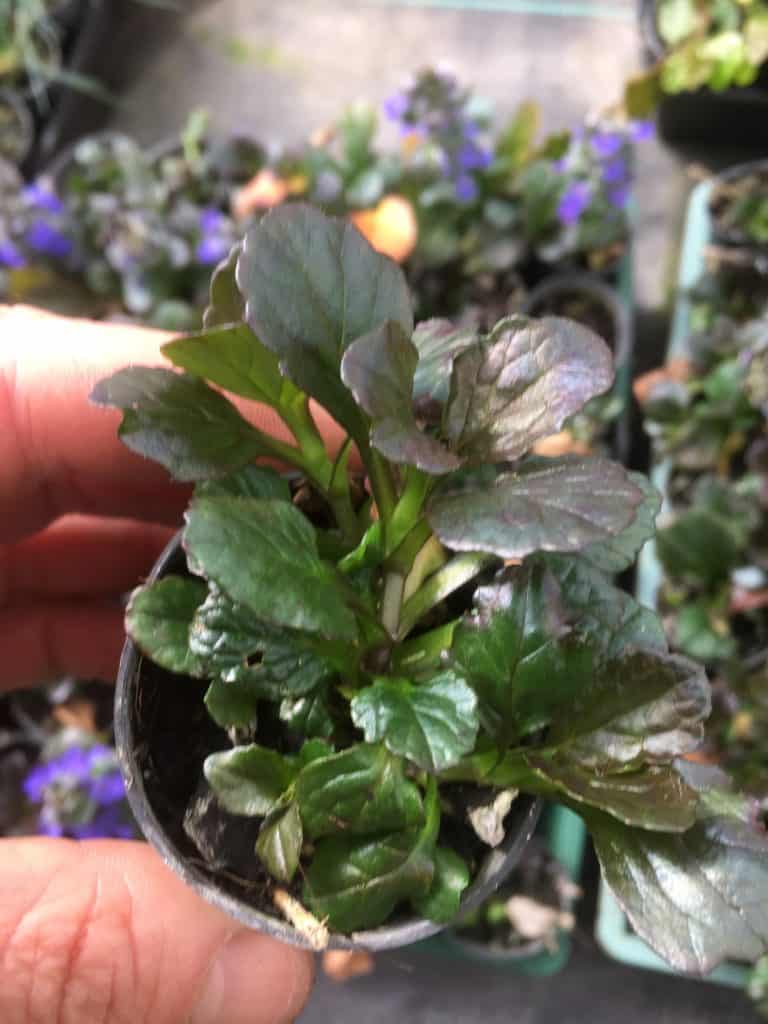
Separating Ajuga plants
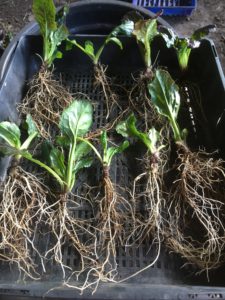
Individual plants in one pot
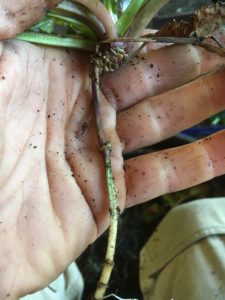
Air roots on ajuga runner
Cuttings
Cuttings are another great way to create additional Ajuga plants. This method takes a little longer, but it’s not as messy.
The Ajuga cuttings we took for the purpose of this article were ready in 2 months. It was winter when they were taken so this timeframe would be reduced in warmer weather.
To take the cuttings you just snip of pieces of the plant that are the crown parts (photos below). The cutting is basically a small individual plant without roots.
To strike these cuttings
- Place each individual cutting in a small tube(pot) we use 2′(50mm) pots.
- Gently fill the pot with a high quality potting mix.
- Water thoroughly.
- Store these potted cuttings in an area thats sheltered from wind, direct sunlight and extreme temperatures.
- Keep the potting mix moist at all times.
After a month or 2 you should start to notice roots emerging from the pot. Allow the plant to put on some new growth and the root system to fill the pot before planting into the garden.
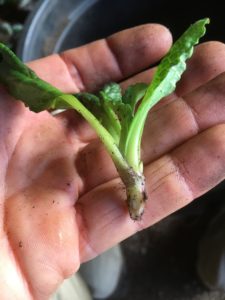
Ajuga crown cutting
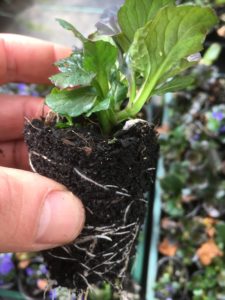
1-2 months later
Root cuttings
Root cuttings take the longest to create a viable ajuga plant, I however find this method really cool.
We have used this method in the past to get maximum numbers of plants out of a single pot, we brought locally. First we divided the plant, then any crown pieces that we accidentally broke off without roots we used the cutting method and finally with the remaining roots we created more plants.
To create new plants using the root cutting method we remove half the roots from a plant in a pot. Alternatively you could dig up some roots from an existing plant, however if your doing that its much faster to just divide the plant.
This is more for increasing the maximum number of plants you can create off a single purchased plant.
The roots should be white and healthy looking. Roots that are old and dying will be brown.
We place our roots into a seedling tray, if you prefer you could use a pot. Use a decent potting mix. You only need an inch or 2 of potting mix below the roots, then very lightly cover the roots with potting mix.
Water the seedling tray and keep moist. Its best to keep them in a sheltered area, but just keeping them out of temperature extremes will be fine.
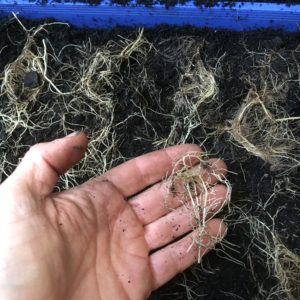
Nothing will happen for about 3 months. After 3 months you’ll start to see small plants emerging. The more roots you used the more individual plants you will get.
From the roots we put in the seedling tray we got about 50 new plants!
The individual plants will need to be separated and potted into individual pots while they are still quite small. If you leave them for too long the stronger plants will smoother the weaker ones.
After you’ve potted the Ajuga’s place them into a sheltered area just until they get a little more established. Once they double in size plant them out into the garden.
If this article has been helpful in anyway we would love it if you would subscribe so we can notify you when we publish other helpful articles. Happy Planting:)
CLICK HERE TO SEE OTHER PLANTS WE PROPAGATE
Plant we took root cuttings from
Placing root cuttings into tray
Plants emerging after 3 months
Propagation Kit
We have also put together a resource page that contains links to the products we use or similar. If you want to check that out click the link.
Ajuga Propagation Video
Ajuga reptans- Purpurea
Ajuga reptans -Purpurea is a very easy to grow ground cover. It has glossy purple leaves. Produces spikes of purple flowers in late spring into summer.
A great choice as a living mulch under established trees, will form a dense carpet. Can also be used in rockeries, as a border or even spilling out of containers, or over retaining walls.
A very adaptable plant. It can be grown in all light levels full sun, part shade and full shade. Will tolerate all soils except for very dry. Can even handle quite wet soils.
Cultural notes
Botanical name: Ajuga reptans- Purpurea
Common name: Bugle, Bugleweed, Bugleherb and Carpetweed
Family: Lamiaceae
Native to: Europe
Flowers: Spring
Position: Full sun/Part shade/ Shade
Height: 20cm
Width: 1-2m
Answers to Ajuga related Questions
Can Ajuga be grown in full sun?
Yes. Ajuga can be grown in full sun. I personally prefer to position them under trees where they can provide a living mulch to suppress any weed growth.
Another reason we like to grow them under trees is it protects them from frost in winter. Even under trees they still flower quite well.
How tall does Ajuga get?
Ajuga reptans is a ground covering ajuga. The foliage itself will only reach 2-3 inches off the ground. The flower spikes will poke up about 6-9 inches off the ground.
Is Ajuga invasive?
In our area no. However here they don’t seem to self seed. I could imagine that if the climate allowed self seeding they may become invasive.
As I mentioned we like to grow Ajuga under trees as a living mulch, so within this area we allow it to take over. We’ve not had any issues with it spreading into unwanted areas of the garden.
Does Ajuga die back in winter?
In our climate no it does not. We get frosts during winter but not snow. The frost will brown the leaves. By planting under trees they are sheltered from the frost and stay evergreen all year round.