
Hellebore propagation using seed
This article will show how to propagate hellebores from seed you collect. Using seed to propagate hellebores will produce plants that are genetically different to the mother plant. If you want to produce identical plants to the mother plant you must use division to propagate your hellebores.
Hellebores also often known as Lenten rose, Winter rose or Christmas rose are a very popular plant. They have long lived flowers that are produced during winter and into early spring. They come in an assortment of colours and flower types.
We personally like hellebores planted in large drifts under deciduous trees particularly silver birch. Mixing multiple colours and allowing them to naturalise creates a stunning woodland landscape.
How to collect seed
Hellebores produce flowers beginning in mid winter and into early spring. The flowers will produce seed, provided they are pollinated and not picked before the seed forms.
I know it’s tempting to remove the flowers once they are finished, but if you can just be a little patient you’ll be rewarded with heaps of seeds.
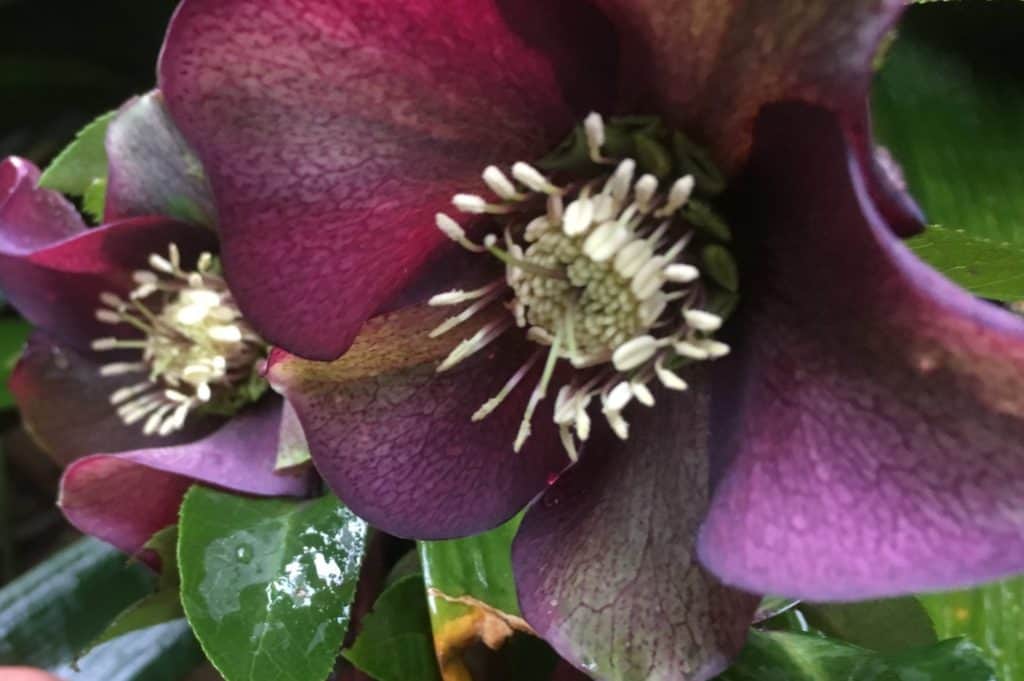
It is possible to pollinate the flowers by hand. To do this grab a Q tip (cotton bud) and rub the male part of the flower which is called the stamen. The stamen has the pollen. then rub the Q tip over the very centre of the flower, this part is called the stigma, and forms part of the carpel which is the female repoductive parts of the flower.
Using this method it is possible to create the same colours as the parent plants, however the flowers must be covered to prevent the bees and insects from pollinating the flowers before you do.
This is also the method that professional hellebore growers will use to develop new varieties, colours, and flower types. It can be quite time consuming but it’s a fun experiment. So if you’ve got time on your hands, why not give it a go?!
If you decide to pollinate by hand write down the colours of the parent plants you use. This way if you create a flower colour or type you really like, you’ll be able to recreate it.
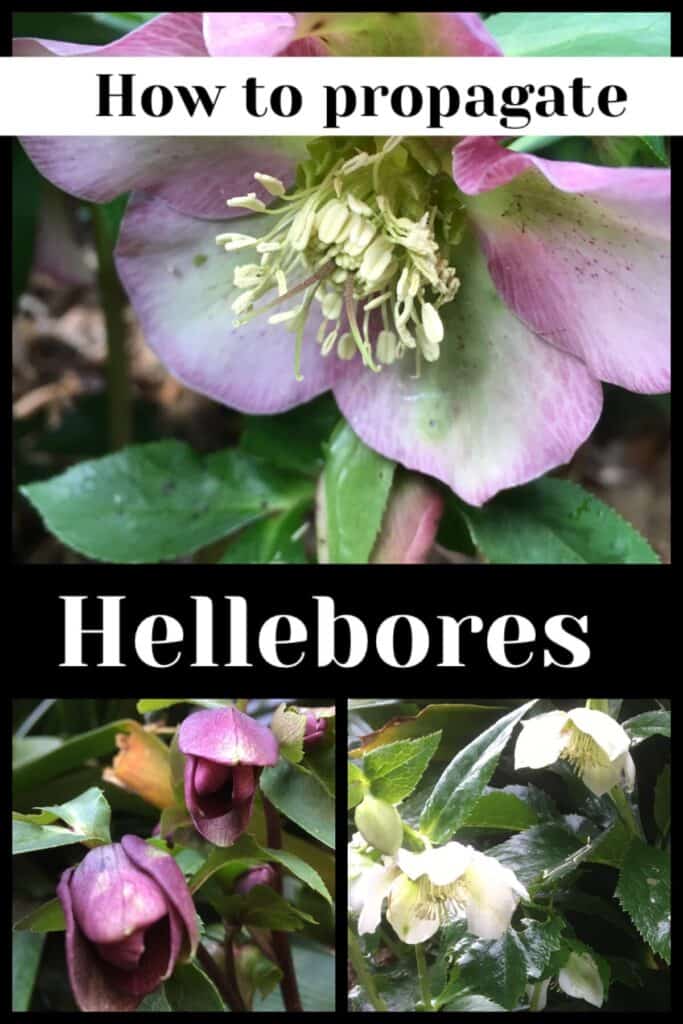
The seeds are housed in pods. The pods appear where the stamen and carpel were (these are the flowers reproductive organs). Right in the middle of the flower.
Hellebore seed pods forming
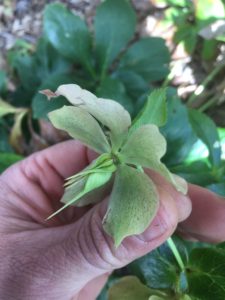
Hellebore seed pods ready
Once the pods are quite full looking and appear about ready to split open then flowers can be cut off. We place the flowers in a paper bag for a week or 2. This allows the flowers to dry out and eject the seeds into the bottom of the paper bag.
You can also simply allow the seeds to fall to the ground. The seed will usually germinate directly under the plant the following winter.
If you do not have any hellebores to collect the seed from, you can usually buy hellebore seed which people list on ebay. Click here to check prices. Keep in mind it’s best to buy the seed in very late spring or early summer as this is when the seed will be fresh and viable.
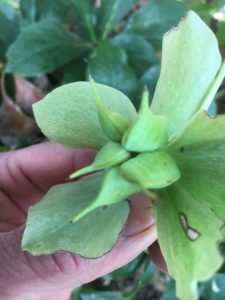
Hellebore flowers in paper bag
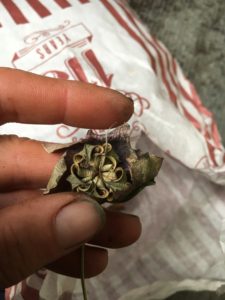
Dried seed pod opened up
Sowing the seed
Hellebore seed should to be sown while fresh. As soon as all the flowers in the paper bag have ejected the seed, we sow them.
Sowing the seed is simple
- Fill a seedling tray with a good quality potting mix.
- Then sprinkle the seeds over the top.
- Very lightly cover the seeds with potting mix. (The general rule when sowing any seed is to only cover or bury seed by it’s own depth)
- Water.
- Store the tray in a shaded area outside is quite fine.
- Keep the potting mix moist but not water logged.
The seeds will germinate during the following winter when mature hellebores are beginning to flower. Remember you can simply allow the seeds to fall directly into the garden. The mother plant usually shelters them sufficiently.
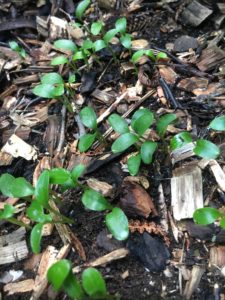
Hellebore seedlings in garden
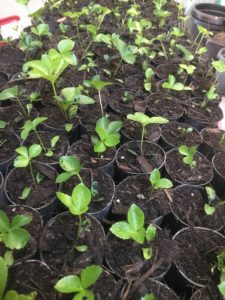
Hellebore seedlings in seedling tray
Potting hellebore seedlings
If you allowed the hellebores to self seed they will emerge in tight dense clusters under mature plants. If you used a seedling tray you should have a thick carpet of baby hellebores. These babies will need to be separated and potted into individual pots to survive.
If you leave them as they are only a few will survive. Firstly they will compete with each other for nutrients as they are packed so tight. Secondly once the weather gets to warm many will simply succumb to the heat.
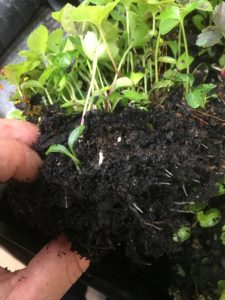
If removing the seedlings from the garden where they self seeded we usually dig them up before they sprout their secondary leaves. This just makes them much easier to remove as the root system is very small at this stage.
With the seedlings in the seedling tray we usually wait for the secondary leaves to develop. The seedlings pull apart much easier in the potting mix than from the garden soil.
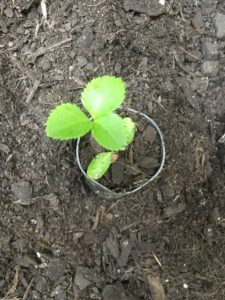
When potting seedlings we almost always use a 50mm (2″) pot. We find this pot provides a decent root system while saving heaps of space. We can fit 42 50mm (2″) pots into the same area as 6- 140mm (5.5″) pots.
Potting hellebore seedling
Potted hellebore seedlings
Pot into a good quality potting mix. Hellebores love plenty of organic matter and a mix that is easy to keep moist. If you have your own compost or worm farm this would be perfect.
We always water our freshly potted seedlings with a seasol solution, this will reduce any plant stress from the transplant and encourage strong healthy root growth.
Once the hellebores are separated and potted into individual pots they will grow quite quickly. By the middle of spring they should be well and truly ready to plant into the garden.
We hope this article has been helpful. If so please subscribe. Below is a short video.
Happy planting 🙂
Click here for more plants we propagate
Propagation Kit
We have also put together a resource page that contains links to the products we use or similar. If you want to check that out click the link.
Propagate hellebores- by seed video
Helleborus orientalis
Helleborus orientalis- winter rose is an evergreen perennial. It has attractive deep green foliage. It produces long lasting flowers in a range of colours from winter into spring.
A great mass planting choice for under deciduous trees, where they provide a great burst of colour. Flowers and leaves can be used in cut flower arrangements as the are long lasting.
Prefers cooler climates. Does best in shade or part shade, hot summer sun will burn the leaves. Needs moist well drained soil. Will tolerate frost and periods of dryness.
Cultural notes
Botanical name: Helleborus orientalis
Common name: Winter rose, Lenten rose, Hellebore
Family: Ranunculaceae
Native to: Europe & Asia
Flowers: Winter-Spring
Position: Full shade/Part shade
Height: 40cm
Width: 40cm